
5 methods to make use of a sandbag – Weblog
[ad_1]
I completely LOVE utilizing sandbags in my yoga observe. As somebody who has an anxious thoughts and tends to over fear, it’s most likely no shock that I gravitated in direction of extra grounding practices like restorative yoga. With its emphasis on utilizing a lot of props to assist the physique and lengthy holds (postures are held between 5-20 minutes), restorative yoga permits for a gradual downshifting of the nervous system to assist relieve the stresses for day by day life and depart you feeling replenished and renewed.
Sandbags have been a staple in Iyengar yoga, which is the place the restorative yoga observe has its roots. Including weight to the physique, by the usage of sandbags or eye luggage, can assist to offer an expertise of grounding, bringing you out of the enterprise of the thoughts and into your bodily physique. It gives a delicate soothing sign to the mind-body connection that it’s secure, like a swaddle can soothe a child, stimulating the parasympathetic nervous system (our relaxation and digest response). This creates a sense of calm and safety, which helps to ease emotions of stress and anxiousness.
Right here fellow restorative trainer, Yogamatters August co-host and my pricey good friend, Yvonne O’Garro, and I reveal 5 methods to include sandbags into your restorative observe.
Enjoyable reality: it was truly our mutual love of sandbags that first bonded Yvonne and I once we first met! 🙂
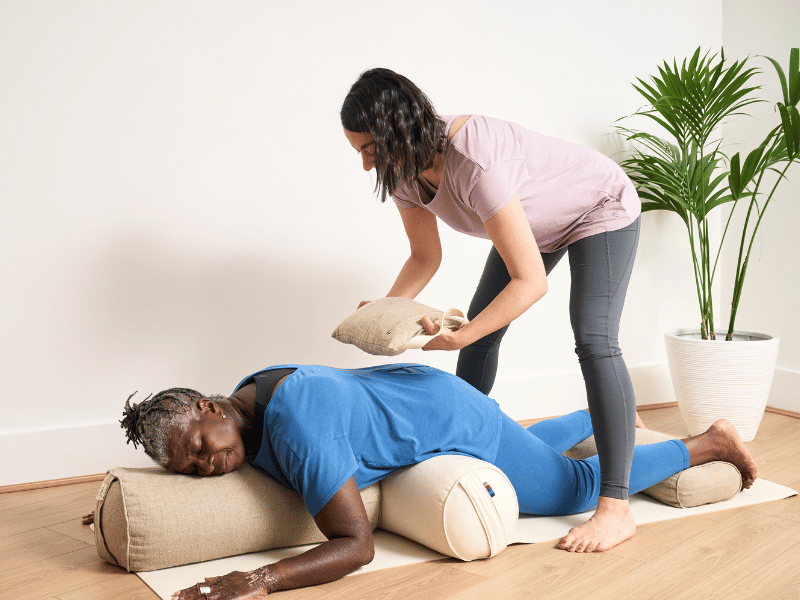
Reclined sure angle
4 blocks, 2 bolsters, 2 bricks, 2 eye pillows, 2 sandbags
A basic restorative posture, reclined sure angle or supta baddha konasana, sandbags may be integrated into this pose to assist floor the thigh bones.
- Place one cork brick horizontally on the high of the mat. Add a second brick vertically angled on high of the primary brick and place the bolster on high. This will likely be to assist the backbone.
- Add a neatly folded blanket for the top.
- Come to take a seat on the mat along with your again to the bolster and convey the soles of your ft collectively, permitting the knees to open extensive.
- From there place two blocks on both facet of the leg. The primary block will lay flat with the second block angled to assist the outer thigh. Repeat on the opposite facet.
- Lie again alongside the bolster, ensuring the top and neck have the assist of the folded blanket. Launch the pores and skin of the shoulder blades down the again and lengthen the tailbone down in direction of the ft.
- Place the sandbags on both hip to floor the thigh bones.
- Choice to position a mini bolster over the tops of the ft for grounding (as proven within the picture).
- Keep for 10-20 minutes.
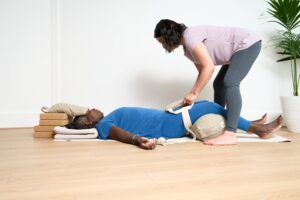
Downward savasana
2 bolsters, sandbag, small rectangular bolster
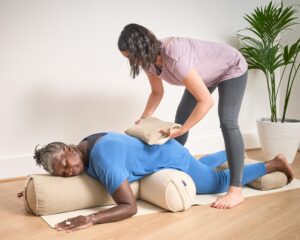
Putting weight alongside the sacrum (the again of the pelvis) in any downward going through posture like little one’s pose or downward savasana, can assist to create size alongside the decrease again in addition to launch pressure.
- Place one bolster vertically on the high of your mat and the second bolster horizontally throughout the width of the mat.
- The bolsters ought to be touching creating an the wrong way up ‘T’ form.
- Use a small rectangular bolster (as proven within the picture) or a rolled up blanket on the backside of the mat to assist the ft.
- Come onto all fours (fingers and knees) and place the tops of your ft over the mini bolster/rolled blanket.
- As you convey your self down onto your bolsters, the decrease stomach will relaxation on the horizontal bolster, simply on the hip crease, and the ribs, chest and head will relaxation onto the vertical bolster.
- Flip your head to whichever facet feels most comfy.
- Enable the forearms to relaxation onto the bottom, with the elbows barely away from the physique to assist launch throughout the tops of the shoulders.
- From there place your sandbag over the again of the pelvis and barely pull down in direction of your backside to create a sense of size.
- Keep for 10-20 minutes.
Reclined twist
1 Blanket, 1 bolster, 2 blocks, 2 sandbags

On this reclined twist there’s the choice to make use of one or two sandbags, relying on what you have got at your disposal. As you’ll be able to see within the picture above, one sandbag is positioned over the fitting hip, with the load of the sandbag barely drawing down away from the physique to assist anchor the hip down and create extra size alongside the fitting facet physique. The second sandbag is positioned over the fitting shoulder, which is especially helpful in serving to to attract the fitting shoulder down in direction of the ground to assist deepen the twist.
- Take a folded blanket and create a small roll, which can assist the pure inward curve of the neck.
- Place two blocks, in portrait orientation, facet by facet, to the left hand facet of the mat after which place the bolster on high.
- Come to lie down on the mat with the top on the blanket and the small roll underneath the neck.
- Bend your knees and convey your ft to the ground. From there increase your hips and shift them over to the fitting.
- Straighten your left leg down and hug your proper knee in in direction of your chest.
- On an exhalation draw the fitting leg throughout the physique to the left, putting the decrease leg onto the raised bolster.
- The fitting knee ought to be roughly according to your hip, making certain that the entire of the decrease leg from the knee to the foot is supported on the bolster. Choice to position a bolster alongside the outer proper hip to assist lower the hip down and away from the fitting shoulder.
- Prolong your proper arm out to the fitting, with palm face up.
- If the fitting shoulder doesn’t fairly attain the bottom you’ll be able to shuffle your leg shoulder barely to the left to assist launch the fitting shoulder down. Right here is the place you can too place one other sandbag to assist encourage the fitting shoulders in direction of the earth.
- Keep for 5-8 minutes after which repeat on the opposite facet.
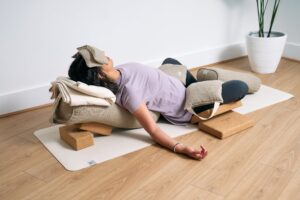
Savasana model 1
1 sandbag, 1 blanket, 1 belt, 1 bolster
Savasana is among the easiest poses so as to add the usage of a sandbag to. It’s additionally a pose that’s carried out on the finish of most yoga lessons, no matter class type, so you’ll be able to incorporate this on the finish of any yoga observe. Putting weight over the entrance of the thighs helps to anchor the legs and really feel grounded.
Right here is a straightforward savasana arrange:
- Neatly fold a blanket for the top, with the graceful rounded edge in direction of you.
- Create a loop with the belt and thread your legs by the loop. Carry the strap to mid-thigh and tighten sufficient that it holds the legs collectively hip distance aside.
- Place the bolster to the again of the thighs, simply behind the knees.
- When you lie down with the blanket underneath the top and neck, the strap across the legs and the bolster behind the thighs, you’ll be able to place the sandbag over the entrance of the thighs, just under the entrance hip factors.
- Keep for 10-20 minutes.
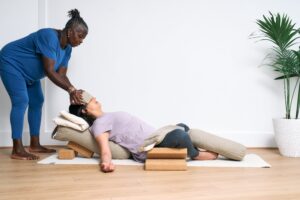
Savasana model 2
4 blocks, 1 sandbag, 1 blanket, 1 belt, 1 bolster
Putting a sandbag over the brow has an analogous feeling to utilizing a watch pillow, nonetheless the sandbag has a bit extra weight to it. Including weight to the brow can assist to subtly sign to the thoughts to quieten and settle.
- Previous to mendacity down for savasana, stack 4 blocks on the high of the mat, simply above your head.
- Place the sandbag on high of the 4 stacked blocks after which lie down for savasana.
- Pull the sandbag down barely from the blocks till it covers your brow.
- Because the sandbag is huge, solely a 3rd of the sandbag will likely be in your brow with the remainder of the sandbag nonetheless resting on high of the blocks.
- Be sure to evenly distribute the load throughout the brow.
[ad_2]